Introduction
I have practiced Tai Chi for 40 years. The first 10+
years I was fortunate to have a dedicated and skilled teacher and be part of a
group of serious, but also sociable students. I also had the opportunity to
participate in workshops with Grand Master, Tung Kai Ying.
Then I moved to a place, where nobody had heard of or
cared about Tai Chi. I was reduced to practicing by myself. Slowly, Tai Chi
faded into the background and almost out of my life. But I could not let it go,
and after a couple of years, I picked it up again, gradually increasing how
much I practiced. I also re-read the classics more closely than ever, hoping to
find hints on how to improve my Tai Chi. Through a combination of reading the
classics and practicing daily, a new understanding gradually emerged.
I had long been aware that breathing corresponded to
some extent with the transfer of weight, but the underlying principles eluded
me. When I first learned Tai Chi, I was only taught the basics of how to
breathe – never when to breathe.
I was, however, introduced to the concepts of Full and
Empty in my very first Tai Chi lesson as well as their correlation with weight
distribution. But it was not until many years later, that I suddenly realized
some deeper implications of the concepts.
My Full/Empty epiphany had direct bearings on my
search for the underlying breathing pattern in the practice of Tai Chi. It
still took years of practice, and a lot of trial and error before I had the
general concepts in place. But I do now.
I have a system, and it works – at least for me.
A large part of it is firmly rooted in the classics.
Some of it, however, I never encountered anywhere, and that raises questions
such as:
·
Were my teachers unaware of these things?
·
Were they keeping secrets?
·
Am I completely wrong (it wouldn’t be the first time)?
·
Did everybody else know this, except for me?
·
Or…have I stumbled upon something important?
In the end I decided that if, indeed, I have found
something that can be useful to others, I have no right to keep it to myself.
That is the reason why I am writing this.
In the next section, Theory, I will try to explain the
principles of the system.
Theory
Full and Empty
When practicing Tai Chi, one should avoid being
double-weighted, which means that the bulk of the body should be carried by one
leg instead of being evenly distributed on both legs.
The weighted leg is Full, the other leg is Empty. When
the left leg is Full, the right hand is Full, when the right leg is Full, the
left hand is Full. This implies a connection between opposing hand and foot,
like this:
Fig. 1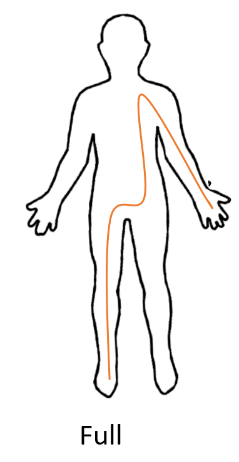
Notice how the connection goes up through the left
leg, crosses through the lower dantian up through the right side of the body,
into the arm, ending in the right hand.
There is a corresponding path, Empty, from the
opposite foot to the opposite hand like this:
Fig. 2 
When weight shifts from one foot to the other, Full
and Empty trade places.
The Empty/Full duality reflects the Yin/Yang duality
with Full as Yang and Empty as Yin. The implication is that the Full part of
the body is the source of movement, while the Empty part is being moved,
simply following along.
Once, my old teacher asked the class if we had noticed
circular or spiral sensations inside our bodies while practicing. Some had,
some had not. I had noticed something like it, but I did not know what to do
with it, and my teacher never elaborated. To me, these movements seemed to
connect with the Full/Empty paths, but I could not fit the pieces together at
the time.
More about this later, but first some thoughts on
breathing.
Breathing
When it comes to breathing, there are two points of
particular interest. The first one is how to use the nose and mouth, the second
is how to use the abdomen and lower back.
The first one has been described extensively by many
sources, so I will just sum up the basics:
Rest
the tip of the tongue on the alveolar ridge (the ridge behind the upper front
teeth).
Inhale through the nose.
Exhale through the mouth (lips
only slightly apart).
The second one needs more consideration.
All the descriptions I have seen of Taoist abdominal
breathing seem to refer to sitting meditation, and thus, in my opinion, they
are not applicable to the practice of Tai Chi. There must be a different way to
do abdominal breathing, a way that includes the limbs and is suited for a
moving body.
Trying to apply the concept of open/close to breathing
while combining it with the experience of circular movements inside the body, I
came up with this idea:
Visualize two vertical cylinders inside your abdomen –
from the diaphragm to the lower dantian. Together they fill out pretty
much the entire abdomen, touching each other precisely at the vertical Central
axis of the body. The axes of the two cylinders, respectively, correspond with
the Full/Empty paths described earlier.
Seen from above it looks a bit like this:
Fig. 3 
Seen from the front it looks a bit like this:
Fig. 4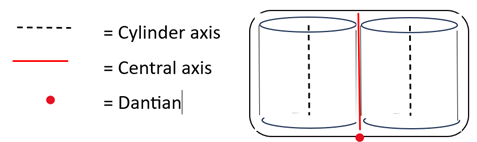
…a bit like a wringing machine.
As you breathe, you visualize the cylinders rotating.
They rotate from front to back when you inhale. They rotate the opposite way
when you exhale.
Seen from above it looks like this:
Fig. 5 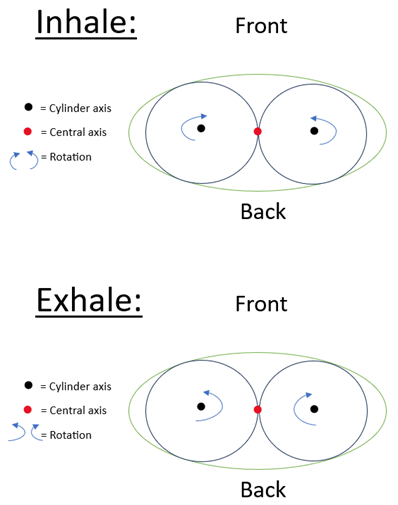
As you breathe, relax the shoulders, the upper torso,
and the diaphragm. Also, be aware of the Central axis of the body and keep both
that and the cylinders vertical. Relax and let the air flow freely in and out
of your lungs.
It may feel awkward at first, but it should not take
long to get the general feel of it. Still, it takes a fair amount of practice
to apply it effortlessly. If you get light-headed, sit down, breathe more
slowly, or maybe just stop trying for a while.
The three axes
Once the breathing technique is established, the next
step is to extend the centers of the breathing “cylinders” to conform with the
Full and Empty paths leading from each foot to their respective opposite hand.
These paths form two axes that are essential to every movement.
The movement is initiated by rotating the Full axis –
starting in the foot and continuing up through the leg until it passes through
the dantian, up through the opposite side of the body through the arm and into
the hand. In the dantian and in the body, the rotation sets the Empty axis in
motion, making it rotate in the opposite direction all the way from the Empty
foot to the Empty hand. The direction of the rotation corresponds with the
breathing.
All of this happens simultaneously.
The third axis is the vertical Central,axis of the
body. While the Full and Empty axes snake and bend as they rotate, the Central
axis stays straight, upright, and centered. The Central axis only turns when
the entire body turns, always keeping with the four directions - front, back,
left, and right.
It looks a bit like this:
Fig. 6a 
In the torso, the Full/Empty axes align with the
Central axis to define and maintain the four main directions. Seen from above,
it looks something like this:
Fig. 6b 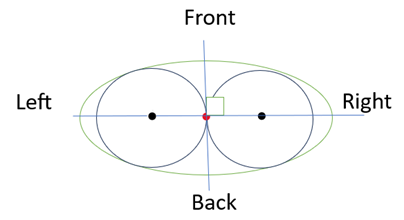
In theory, this system seems neat and simple, almost
easy, but putting it into practice can be quite challenging. In the next
section I will give an introduction on how to implement it.
Practice
Listening and Visualizing
Before I get into the details of how to implement the
system in practice, I need to discuss the approaches of Listening and
Visualizing, and how the two supplement each other. Every Tai Chi practitioner
uses them, even if they may call them something else. In fact this double
approach is so deeply ingrained in most people’s Tai Chi practice, that they
take it for granted without thinking about it much. This is precisely why I
think it is necessary to pause for a minute to define and discuss it.
Listening is what you do when you pay attention to the physical sensations of your
body. When you listen to – or for – something in the original sense of the
word, you need to be quiet, relaxed, and attentive in order to take in all of
the different sounds you hear. The longer you can stay in this unfocused but
attentive mindset, the more sounds you will eventually be able to distinguish.
The approach is the same when you Listen to your body:
Relax and try to neither focus on, nor block out any physical sensation. That
way you will gradually increase your body awareness.
Visualizing is what you do when you imagine various structures,
places, or processes in your body. When you visualize something in the original
sense of the word, you try to see something that is not there, building a
mental image of it. It is a focused act of creation – precisely the opposite of
listening.
This is the approach you use in Tai Chi practice when,
for example, you imagine that you are suspended from the top of your head, or
when you focus on your dantian.
You need to do Listening and Visualizing
simultaneously. And you need to balance the two, so they can benefit from each
other.
When you Visualize too hard or too much, you will
misinterpret or unconsciously ignore a lot of the sensory input you get from
your body. You might even imagine or Visualize some things so strongly, that
you deceive yourself into believing that they are fixed and real. But whatever
mental images you may have of the underlying principles and structures of the
movements, they should constantly be tested and challenged by what your body
tells you, and where it tells you it wants to go.
If, on the other hand, you do not Visualize enough,
the sheer amount of your body sensations will soon swamp you and lead you in
conflicting directions. You need to have some underlying idea or image of what
you are doing in order to structure and make sense of what your body is telling
you.
You can really not Listen too much to your body. But
it is important that you keep an open mind, so you do not hear only what you
expect to hear, instead of what your body is actually telling you. It is
equally important to remember that you should not let yourself be distracted by
the various sensations coming from different parts of your body. Keep your
focus on the basics and trust your body to take care of the details by itself.
Be aware, but do not interfere.
Everybody will find themselves making the errors, I
have just described. And not just once – we make them continually, over and
over, often in new and unexpected ways. This is not a bad thing. Every time we
find ourselves making an error, it means that we have gained a slightly deeper
understanding.
And now, back to the main subject.
To get a fuller understanding of the following
paragraphs, it may be helpful to pause from reading at regular intervals and
get on your feet to try and apply the content in practice. If you choose to
apply it to actual Tai Chi movements, I suggest you start with Brush Knee,
Repulse Monkey, or Parting Horse’s Mane, since these are done both to the left
and the right side.
Tracing the paths
The Full and Empty axes can be Visualized in many
different ways. For example, as garden hose, string or twine, gear cables,
steel wire, or simply just narrow canals or vessels – either empty, or filled
with air or fluid. Anything long, thin, and flexible will do for a start – your
perception and Visualization of them will develop and change over time anyway.
You Visualize the axis as starting in the center of
the foot sole, going through the center of the ankle, the central axis of the
lower leg, the center of the knee, and the central axis of the thigh. At the
top of the thigh, it turns sideways at an approximately 75° angle, going in a fairly straight diagonal line
through the dantian and continuing until it turns upwards again at the top of
the pelvic bone to go vertically through the center of the opposite side of the
torso in a straight line parallel to the body’s central axis. At shoulder level
it turns again to go through the shoulder, the central axis of the upper arm,
the elbow, the central axis of the lower arm, the wrist, and ending in the palm
of the hand.
This is not easy, but try it anyway. Start with just
the weighted foot – the Full axis – and proceed like this:
Stand relaxed with parallel feet. Transfer your body
weight to one foot and open that foot to a 45° angle. Visualize the rotation of
the Full axis – outwards in the foot and leg, inwards in the opposite side of
the torso – while you inhale. Only rotate the axis, the surrounding muscles
simply stay relaxed. They may move slightly, but that is not your concern. At
the same time, put the other foot forward as far as you can without shifting
the weight.
When you are no longer inhaling, you let the weight
shift on to the front foot, exhaling at the same time. As soon as the weight
begins to shift and you start to exhale, the front foot becomes the Full foot,
rotating the new Full axis inwards in the foot and leg, and outwards in the
opposite side of the torso.
When almost all weight is transferred, you open the
Full foot 45°, lift the back leg and let it come forwards, inhaling at the same
time. As you inhale, the rotation in the Full leg reverses to go outwards in
the foot and leg, and inwards in the opposite side of the body.
Repeat the procedure for each step you take.
Relax as much as possible and pay attention to the
Central body axis to maintain balance and direction. Both the lower and the
upper parts of the torso as well as the thighs (to the extent that it is
possible) should face forward at all times. The direction must be clear and
well-defined.
Setting the Empty axis in motion
Even if you are only actively moving the Full axis,
you still need to Visualize how the Empty axis is being moved as well. There is
more than one way to do this.
One way to do it, is to use the image of the cylinders
I presented in the section on breathing (fig. 3-5). The active cylinder touches
the passive cylinder, which will be set in motion when the active cylinder
begins to rotate, thus moving the entire Empty axis from foot to hand.
Again, it is important to stress that this is just a
mental image to help you focus and structure the movement, not a physical
reality. You need to relax your actual body as much as possible, and Listen to
it while you Visualize.
Another way to do it, is to focus on the dantian,
where the Full and Empty axes pass through each other. If you Visualize the
axes going through the dantian at an angle less than 45° on the vertical plane,
it is possible to imagine how the Full axis creates a “backwards” rotation when
you inhale and a “forwards” rotation when you exhale. Where the axes merge in
the dantian, the rotation of the Full axis will set the Empty axis in motion.
It looks a bit like this:
Fig. 7

Often, “turning the waist” is interpreted as turning
or rotating the upper body from side to side, while the foundation – hips and
legs – keep the direction. This is a different kind of “turning the waist”, but
in my experience it is a better one. It eliminates unnecessary twisting of the
body, gives clearer focus and direction to the movement, and keeps the upper
and lower parts of the body connected.
This second method is more challenging than the first,
but at the same time also more rewarding. If you are really ambitious, you can
try to do both simultaneously.
Advice
Practicing Tai Chi is an individual experience. We all
have different backgrounds, different mentalities, different physical
challenges and advantages. There is no one-size-fits-all. Still, I will throw
in a bit of general advice at this point.
Firstly, if you choose to implement the three axes by
first focusing on the Central axis, then incorporating the Full axis, and
finally getting to the Empty axis (which seems to me like a sensible way to do
it), you can easily get the feeling that the Empty axis needs extra attention,
once you finally get to it. But if you pay too much attention to the Empty
axis, you may find yourself moving it, rotating it, to help it along. Suddenly
you are treating the Empty axis as if it were Full. This is a mistake. The best
you can do for the Empty axis is to clear whatever mental and physical
obstacles it may encounter by relaxing your body and keeping an open mind.
Again, be aware, but do not interfere.
Secondly, if you concentrate too hard on the Full
axis, your Visualization of it may drift towards the center of the body, mixing
it up with the Central axis. Try to pay equal attention to all three axes at
all times, keeping them separated, and remember that everything needs to be
balanced around the center.
Thirdly, once you begin to get a sense of the Full and
Empty axes, you might experience that they are seemingly not where they are
supposed to be. They may feel more or less displaced, maybe even bending and
going off into unexpected directions. You should neither ignore this, nor
should you try to force the axes to go where you think they ought to be. It is
your body telling you that you need to make adjustments and trying to show you
how. You must relax, Listen, and try to reach a compromise between what you
want, and what your body tells you. This way you will progress more quickly
than if you try to force things. It takes more than one attempt, maybe even
more than a thousand attempts. Even so, it is still the most efficient way.
Many of the adjustments you need to make have to do
with alignment.
Alignment
Keeping the body aligned is essential to Tai Chi
practice. It is a huge and complex topic that I can never hope to cover in
full. There are many moving parts, which all need to align. When you correct
one small bit of your alignment, you need to realign the rest of the body as
well. Furthermore, as soon as you start moving, your alignment will begin to
fluctuate and change, so you constantly need to adjust it. It is an endless
process.
Therefore, I will only put down some general
observations on alignment of the torso.
I choose to divide the torso into three parts:
·
The upper part, which is from the shoulders to the diaphragm – essentially
the rib cage.
·
The middle part, which is between the diaphragm and the pelvic bone –
essentially the gut.
·
The lower part, which is essentially the pelvic area – including the top of
the thighs. The lower dantian is located in the middle of the lower part.
These three need to align in three dimensions:
Vertical, sideways, and directional.
Vertical alignment means that the upper and middle parts of the torso are vertical,
and positioned on top of the lower part. Seen from the side, it looks a bit
like this:
Fig. 8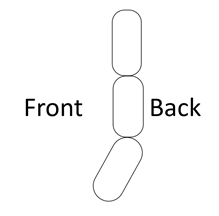
The upper and middle parts should not slide
downwards and forwards so that the buttocks stick out, like this (still seen
from the side):
Fig 9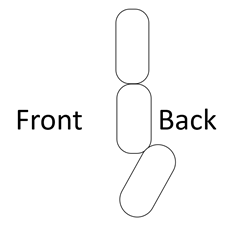
Neither should they tilt,
so that the back sways, or the shoulders hunch like these (still seen from the
side):
Fig 10a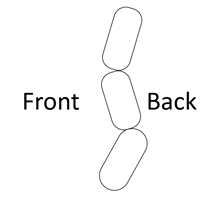 Fig 10b
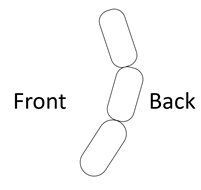
Sideways alignment means that the three parts of the torso should be…aligned
sideways – a bit like this (seen from the front):
Fig 11 
They should not protrude sideways like this:
Fig. 12a  Fig. 12b
 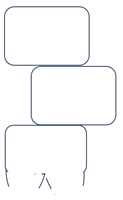 Fig. 12c
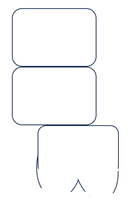
Nor should they tilt like this:
Fig. 13a 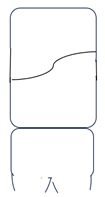 Fig. 13b
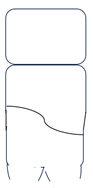
Directional alignment means that all three parts of the torso
should be facing in the same direction. It looks a bit like this (seen from
above):
Fig. 14 
Directional alignment is easily upset. Every time the
body turns or the weight shifts, the three parts of the torso tend to lose
directional alignment, like this for example:
Fig. 15a 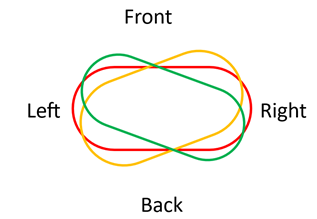
…or this:
Fig 15b 
The important thing to remember here is to turn
the body, not twist it.
-o0o-
The figures above are somewhat exaggerated to
illustrate their points clearly, but even slight imbalances can have
significant impact. More often than not, these imbalances will occur as
combinations of the various types of misalignment.
Once you become aware of an imbalance, the best way to
try and correct it is to use a combination of gravity and focused relaxing.
Release the tension that causes the imbalance and let gravity draw the body
towards a balanced state. Do not use force to help it along.
Be aware that the three parts of the torso do not have
fixed shapes and sizes. They are all three soft and pliable to a certain
extent, each in their way. The more you relax and Listen to your body, the more
you will appreciate this.
Breathing - again
So far, I have covered the breathing technique and how
it is related to the three axes in both theory and practice. But one important
thing is still missing: When to inhale and when to exhale? I have
touched on it briefly already, and I will discuss it a bit more below, but some
of it you will simply have to figure out for yourself. It depends on many
things, for example which Tai Chi style you practice, how fast/slow you
practice, and your level of skill.
The core of my daily practice is the Yang style slow
set as taught by Grand Master Tung Kai Ying. When I do this set, I exhale every
time I shift the weight. At first, I thought there were a few exceptions to
this rule, but over the years I eliminated those. This does not mean, however,
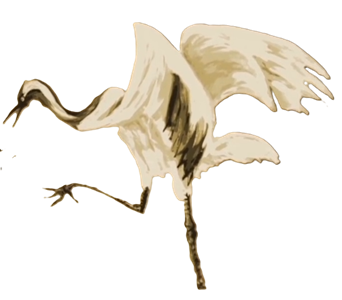
that I only exhale when I shift the weight. For example, from the posture White
Crane Spreading Wings I inhale when the right hand comes down in front of the
body, exhale as the left hand moves in front of the body and the right hand
goes backwards, inhale as the left hand parries to the left, the left leg steps
out, and the right hand comes forwards and passes the ear. I finally exhale
again as I shift the weight forwards, pushing with the right hand and brushing
with the left, coming into the posture Brush Knee. So there’s an extra breath
right there.
I practice other sets as well, which have distinctly
different breathing patterns. And then there are sets I don’t know at all –
they may also be quite different.
As a general rule, one might say that offensive moves
such as punching and pushing are associated with exhaling, while defensive
moves such as parrying and yielding are associated with inhaling.
If you practice a set fairly quickly, you may find
yourself taking fewer breaths than if you practice the same set more slowly.
If you have a certain level of skill, your breathing
may be so deep that you can skip a breath in some places, if that works better
for you.
In the end, though, I think the ideal breathing
pattern is closely connected to how the movements are joined together in the
actual set you practice. I think that if you experiment, you will find that
while most parts of the breathing pattern come naturally, a few can be tricky
to figure out.
Conclusion
The ideas I have presented here have matured and
developed over more than a decade. They have undergone many changes and
adjustments, as I have tried to implement them in my daily practice. They are
still not fully developed and probably never will be. Writing this essay, for
example, caused me to focus on aspects I had neglected, and helped me make a
number of adjustments.
By now, though, I am convinced that the basic
principles of this system are sound, and that if they are followed, they can
improve most people’s Tai Chi. But even if the principles are relatively few
and simple, they can still be difficult to follow. There is a lot to keep track
of. Every time you think that you have got it right, you will invariably
realize at some point that you are not doing what you think you are doing.
Every day, when I practice Tai Chi, I try to implement
these ideas to perfection. I never come close to actually doing so. But I often
fail in new and interesting ways, learning or realizing things I did not know
before – I grow. One might say that I fail successfully. Even writing this
essay has inspired me and helped me correct mistakes I was making. I hope
reading it can be helpful and inspiring to others, so that they too may fail
successfully.
Peter Skov Larsen
Except for the body outline used to make figs 1, 2, 6a, and 16 (appendix B)
which is from Wikimedia commons, all text and illustrations are created by me.
This material may be copied and distributed in part or in full, as long as it
is not for profit, and the original source is cited.
Questions and comments can be directed to peter@friktion.com
Appendix A
Two Ways of Relaxing
Introduction
If I could give only one piece of advice on how to best practice Tai Chi,
it would be this: Relax. You must consciously and intentionally relax your body
while practicing Tai Chi. If you do not relax, your understanding of Tai Chi
will never be more than superficial at best.
Broadly speaking, relaxing means the release or relief of muscular tension.
At any time, all the muscles of the body are in various states of tension that
can go from very little to very much – from completely slack to rock hard. As
the tension of individual muscles increases or decreases, the overall pattern
of muscle tension changes. This is how the body moves.
It is the fluctuations in an individual’s muscle tension patterns that
makes their bodies move. But people’s overall tension levels can differ widely.
There may be more or less the same scope of variation in individual muscle
tension patterns, but some people have higher tension baselines than others.
That which feels relaxed to one person may feel moderately tense to another,
and that which feels a bit tense to one person may feel almost relaxed to
another.
I am convinced that, on the whole, having a low muscle-tension baseline is
better than having a high muscle-tension baseline. I think this goal can be
achieved by actively practicing the relaxation of overall muscle-tension over a
sustained period of time. In the following, I will present two mental exercises
which, when used in combination, can be used to actively practice sustained
relaxing. They were originally meant to be used in Tai Chi practice, but it
should be fairly simple to apply them to other scenarios.
Both methods involve a fair amount of visualizing. This comes easy to some,
while others find it more difficult. But no matter how bad you may be at it at
first, it will still have an effect, and you will improve with practice.
Exercise 1: Hanging
Most Tai Chi practitioners have at some point been asked to imagine their
heads being suspended, hanging from a string at the top of the head or
something similar. This method uses the same principle, but instead of just the
head, you imagine your entire body as a marionette doll, suspended from above,
loosely stringed together in all major joints. The doll’s feet are just barely
touching the ground.
Stand up. Visualize from the top of the head and downwards– the head
hanging from a string at the top, the body hanging from the neck, the arms
hanging from the shoulders, the thighs hanging from the hips, the lower legs
hanging from the knees, and the feet hanging from the ankles, just barely
touching the ground.
Relax and allow gravity to gently release all tension in the joints or in
the limbs.
Exercise 2: Stacking
This exercise seems to be exactly the opposite of the first one, but it
will still relax you, just in a different way. This time, you imagine your body
as a set of building blocks or Jenga blocks, that you stack to build a tower.
It may be useful to imagine the blocks as not weighing very much.
You are still standing. This time you visualize from the floor and upwards.
The feet resting on the floor, the lower legs resting on the feet, the thighs
resting on the lower legs, the body resting on the thighs, the neck and
shoulders resting on the body, and the head resting on the neck.
Gravity keeps every part of your body in place, so you can safely relax and
let go of all tension.
Combining Hanging and Stacking
Both exercises are useful, each in their way. But it is when you combine
the two that things really start happening. You do it like this:
First, do the Hanging exercise very slowly and thoroughly. Pay careful
attention to the physical sensations of your body.
Next, do the Stacking exercise in the same way. Slowly and thoroughly,
still paying attention to the physical sensations of your body.
Now shift between the two, increasing the speed a bit, making the intervals
between the shifts shorter. But do not go too fast – it is about relaxing,
after all.
When you feel comfortable shifting between Hanging and Stacking, it is time
to coordinate them with your breathing. It is quite simple: Every time you
inhale, you do Hanging, every time you exhale, you do Stacking. Once you get
the hang of that, you should always let the rhythm of your breathing decide the
exercise, not the other way around.
Conclusion
This double exercise relies on gravity and is meant to be done while
standing, walking, or maybe even running. You can do it at any time or place -
walking down the street, for example, or waiting in line at the supermarket.
If, however, you pay enough attention to the different physical sensations of
Hanging and Stacking respectively, you will eventually be able to reproduce
them while sitting or lying down. Then you can also do the exercise while
watching a movie, or lying in your bed.
But it is very important to be aware that doing this exercise can very
easily induce a state of meditation or absent-mindedness. Doing it in a sitting
or lying position may even cause you to nod off.
This is why it is somewhat unwise to do it while you have to pay attention
to other things - during social interactions, for example, or while driving.
Even if it is a nice little exercise that can be done almost anywhere at
any time, there is still a time and a place for everything.
Appendix B
Threading the nine-bend pearl
In the Tai Chi classic on how to understand and
practice the thirteen postures, you will find this line: ”Directing the
qi is like threading a pearl with nine bends in the hole. There is nowhere it
does not penetrate.” (translation: Wile). This sounds nice and
poetic, but what does it actually mean? Actually, I have a few thoughts on how
this could apply to the Three Axes system of understanding Tai Chi.
Firstly, it refers to directing the qi with the mind,
threading it through the pearl (which I take to be the body). If you consider
the way you thread an actual pearl, you will find that you twist the thread,
rolling it between your fingertips to help it move forwards, going through the
hole of the pearl. This brings to mind a Visualization of the Full axis as it
curves through the body from foot to opposite hand. The turning of the Full
axis along its path is just like the twisting of the thread through the pearl.
What then, are the nine bends? Should the number even
be taken literally in this context, or does it hold a symbolic or metaphorical
meaning?
When I was young, I dabbled in Yi Jing divination, and
ever since then I have associated the number nine with old Yang - the state of
Yang just before it turns into Yin.
Also back in the day, my teacher would often repeat
exercises nine times, so I started doing so too. Today it has become a habit.
There is no rational reason for it, but it works well.
There are other symbolic and metaphorical uses of the
number nine in Taoist philosophy, but I fear that exploring that path will only
lead to confusion.
So instead, I choose to take the number at face value.
Assuming that the pearl is the body, and the hole is
the path of the Full axis, where are the bends then?
The joints seem to be the obvious place to start. That
would be the ankle, the knee, the shoulder, the elbow and the wrist. But that
only makes five, so another four are needed.
Since the Full axis makes a sharp turn inwards where
the thigh attaches to the bottom of the pelvic bone, and another sharp turn
upwards at the top of the pelvic bone on the opposite side of the body, those
two points are obvious candidates, raising the total to seven.
The lower dantian can not be left out. That
makes eight.
I think the ninth and final bend is found at the point
where the Full axis crosses from the middle torso into the upper torso. It may
not be a bend as such, as long as the middle and upper torsos are directionally
aligned. But, most of the time, they are not. That is what makes this point so
difficult to “thread”. It also makes it a key to aligning the torso
directionally. Thus, I think it qualifies.
In a drawing, the positions of the bends look a bit
like this:
Fig.
16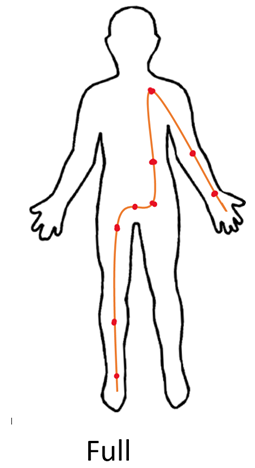
I am aware that this interpretation of the nine-bend
pearl is somewhat speculative, and that a number of objections could be raised
against it. I have seen other, well-argued, explanations of the nine-bend
pearl, which came to quite different conclusions. I think that, ultimately, we
will never fully know the meaning and intention of the original text.
But I also think that this interpretation can function
as a useful mental check-list in the everyday practice of Tai Chi.